All You Need To Know To Read Guitar Chord Diagrams
In past lessons, we have studied how to interpret guitar tabs and scale charts. Equally significant is the skill of comprehending chord diagrams, which provides a simple and fast method for learning chord formations.
In this lesson, If you are a newly guitar player, this blog is for you because we will discuss how to understand guitar chord diagrams and the various types of diagrams you may encounter.
Definition Of Guitar Chord Diagram
Guitar chord diagrams, also known as chord charts, visually show the layout of guitar chords on the fretboard. Despite differences in appearance, all diagrams display the fundamental structure and fret position of the chord. They may also contain details like finger placement, notes, and intervals of the chord.
Chord Diagram Structure
If you’re unfamiliar with chord diagrams, they might appear confusing at first. Here is a brief introduction to the key details included in these diagrams: strings, frets, and notes. Let’s begin by understanding the basic layout of the diagrams before exploring the various notations used.
The chord diagram displays the layout of the guitar fretboard, illustrating the strings and frets. It is commonly shown in a vertical orientation, with the strings depicted as vertical lines and the frets as horizontal lines.
The strings are ordered from thickest to thinnest, going from left to right.
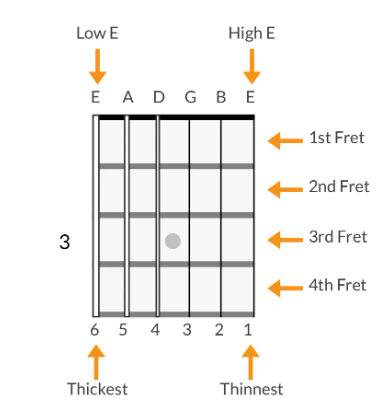
Certain illustrations consist of basic vertical lines to depict the guitar strings and straightforward horizontal lines to signify the frets, as exemplified below.
These diagrams do not include any extra information like note names, intervals, or fingerings. They simply use dots, circles, and Xs to represent the chord.
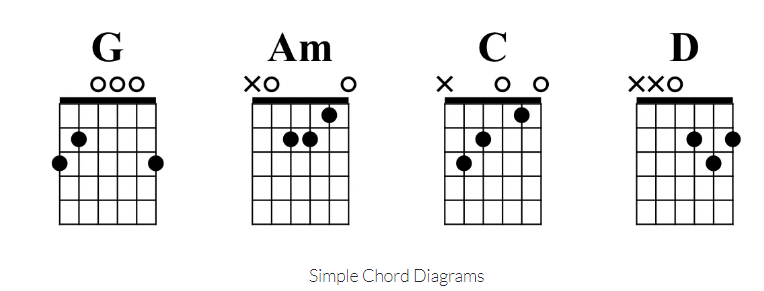
- Solid Dot = note to be played by fingering the note on the fretboard
- Circle = represents open strings that must be played
- X = represents open strings that aren’t played
Certain diagrams will also include symbols that represent barre chords, showing which notes should be played using a barre technique. The diagram below provides a few instances of this notation in action.
The diagrams on this website provide a more realistic depiction of the guitar fretboard, including details like string thickness and fretboard inlays for accuracy. They also offer additional information on the notes. Another distinction is that these diagrams only show the notation for the played notes, without any Xs indicating non-played notes.
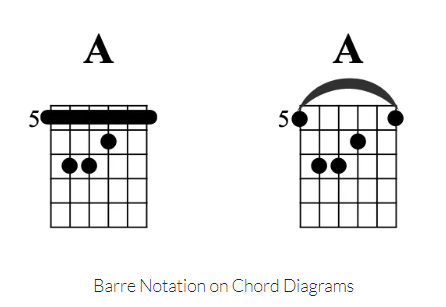
Note Notation On Chord Diagrams
Chord diagrams often show note names on markers to represent the notes comprising the chord, determined by the chord formula and scale. In the example below, the diagram highlights the root note with an orange marker.
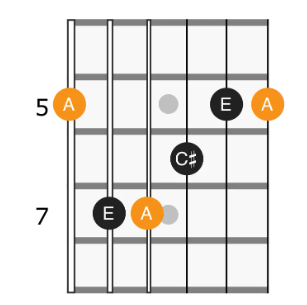
Finger Placement And The Notation of Intervals On Diagrams Of Chords
Some chord charts include numbers or numbers combined with symbols, but the purpose of these markings may not be immediately clear. These markings correspond to various elements and have different meanings. Let’s examine each one individually.
How Fingers Are Notated On Chord Diagrams
In certain instances, chord diagrams may include numbers 1-4 or a T, which indicate the recommended fingering for that particular chord. For example:
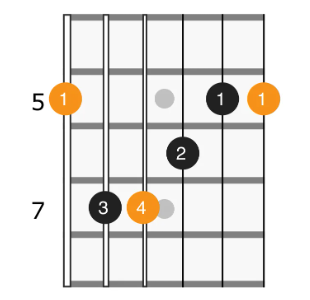
- 1 = index finger
- 2 = middle finger
- 3 = ring finger
- 4 = pinky
- T = thumb
If you find the same number on multiple notes on the diagram, those notes should be played by the same finger in the form of a barre across the strings.
Interval Notation On Chord Diagrams
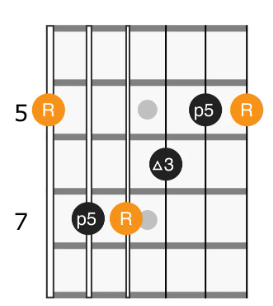
The symbols and numbers on chord diagrams represent the intervals that form the chord, which is called the chord formula. This notation is commonly used on this website. Being able to interpret guitar chord diagrams using interval notation is a valuable skill. Understanding the intervals of a chord is essential for identifying its chord quality, as opposed to just its chord name. It also aids in grasping the underlying harmony. Below is an explanation of the meaning of interval symbols:
- R: The letter R represents the root, which is the fundamental note around which the chord is constructed. Within the visual aids above, the root note is also indicated with an orange symbol.
- ♭2: The ♭ symbol means a flatted or minor interval. This interval is a minor 2nd.
- ▵2: The ▵ symbol is a major interval. In this case, the interval is a major 2nd.
- ♭3: Minor 3rd interval
- p4: The p means “perfect”. This is a perfect 4th interval.
- ♭5: Flat 5th interval
- p5: Perfect 5th interval
- ♭6: Minor 6th interval
- ▵6: Major 6th interval
- ♭7: Minor 7th interval
- ▵7: Major 7th interval
Chord Diagram Notations
The diagram below shows all three types of chord notation diagrams:
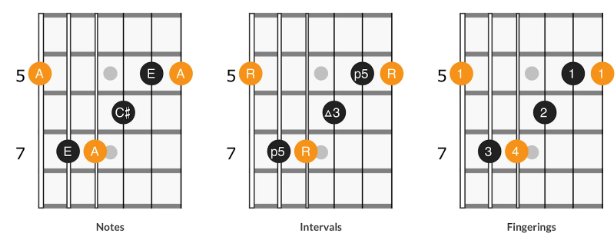
As you can see, being able to interpret guitar chord diagrams is a crucial ability for guitarists to have. These diagrams provide more than just a visual representation of a chord – they also help players understand the connections between notes and how they affect the overall harmony, especially when using interval notation.
Interested in taking your guitar skills to the next level? Click the below and book a free lesson with us! We’re committed to helping you express yourself freely on the guitar without endless scales and theory. Happy playing!
Author: Daniel Powers Jr, the founder of Real Brave™, serves as the chief inspiration to thousands of students in the Real Brave music instruction program. He’s also the visionary behind PracticePad™, an online platform for live one-on-one online music lessons, lesson tracking, and scheduling. Beyond his entrepreneurial pursuits, Daniel leads a non-profit organization that provides formerly homeless children with access to music education, making a profound impact on their lives. His unwavering dedication to music, innovation, and education continues to inspire individuals to reach their fullest potential while creating positive change in communities. Follow Real Brave on all the socials:
Find us on Instagram: https://www.instagram.com/realbraveaudio/
Find us on Youtube: https://www.youtube.com/@realbraveinc
