Everything You Need To Know About The F Barre Chord
Understanding the Barre Chord
Why, look at this chord: The F bar chord (yeah sometimes it’s misspelled), a fundamental element in guitar playing. It is a go-to for many songwriters because it’s in first position and it also is in a few easy keys. It embodies the essence of barre chords if you will—a type of chord where the index finger is used to press down multiple strings across the fretboard. This technique allows guitarists to play chords that are not restricted by the open strings, offering a versatility that is crucial for playing a wide range of music genres. Let’s get a Kraken at making our fingers hurt.
The Significance of the F Barre Chord
As far as guitar chords go, the F barre chord holds a special place for me. Many of my favorite songs utilize it and when I nailed this for the first time, my guitar playing skyrocketed.
It’s often one of the first barre chords that beginners encounter, serving as a gateway to mastering more complex chords. Its significance lies in its structure and positioning: located at the first fret, it provides a foundational shape that can be moved up the neck of the guitar to create other major chords. This movable shape is rooted in music theory, where the same chord shape can be transposed to different notes, offering a practical way to navigate the fretboard. It’s necessary to nail this one, folks.
Music Theory Behind the F Barre Chord
Put on your tinfoil music theory hat for a sec.
From a music theory perspective, the F barre is a major chord. Major chords are formed by combining the root note, major third, and perfect fifth intervals of the major scale. In the case of the F major chord, these notes are F (the root), A (the major third), and C (the perfect fifth). The barre technique allows you to play these notes across different strings, creating a fuller and richer sound compared to open chords.
Why Learn the F Barre Chord?
Learning the F barre chord is a rite of passage for guitarists. As I said, it not only strengthens finger dexterity and hand endurance but also deepens your understanding of chord structures and music theory. Once mastered, it opens the door to advanced playing techniques and a wider array of songs. Whether you’re a beginner looking to expand your skills or an experienced player refining your technique, the F barre chord is an essential tool in your guitar-playing arsenal.
In the following sections, this How-To will delve into the technicalities of finger positioning, strumming techniques, and practical tips to master the F barre chord with absolute clarity. Remember, like any musical skill, mastering the F barre chord takes patience, practice, and persistence. Let’s embark on this musical journey together. Lotsa of words, but totally something that can help!!
Section 1: Basics of Barre Chords
Understanding Barre Chords
Barre chords are a fundamental aspect of guitar playing, characterized by using one finger (usually the index) to press down multiple strings across a single fret. This technique forms the basis for playing various chords up and down the guitar neck, offering versatility in chord voicings and key changes.
The Theory Behind Barre Chords
In music theory, chords are built using a combination of intervals – the gaps between notes. The most common type of chord in Western music is the triad, which consists of three notes: the root, the third, and the fifth. In barre chords, these notes are played across different strings, creating a fuller sound. By barring across the fretboard, you’re effectively creating a new ‘nut’ (the part of the guitar where the headstock meets the neck), allowing you to play the same chord shape in different positions, thereby changing its key.
The F Barre Chord Structure
In the F barre chord, you are essentially moving the open E major chord shape up one fret. This shift transforms the E major chord into an F major chord. Here’s a breakdown:
- Root Note: The root of the F barre chord is F. In the standard E major shape, the root note is on the open E string. When you move this shape up a fret and barre the first fret, the root shifts to F.
- Major Third Interval: In the F major chord, the major third is the note A. This interval defines the major quality of the chord.
- Perfect Fifth Interval: The note C in the F major chord is the perfect fifth. This interval contributes to the stability and fullness of the chord’s sound.
Physical Aspects of Playing Barre Chords
Playing barre chords requires strength and flexibility in your fingers, especially the index finger which needs to bar across the strings. Initially, this can be challenging, and it’s common to encounter difficulties like muted strings or discomfort.
Practical Steps to Forming a Barre Chord
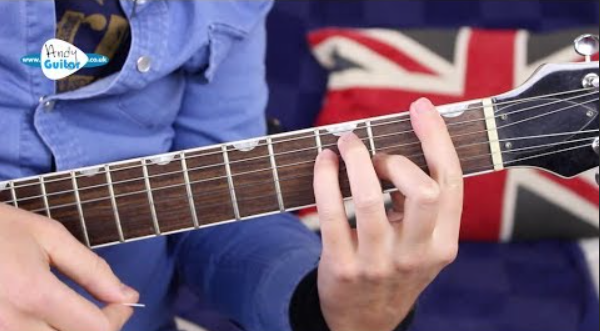
- Positioning the Index Finger: Place your index finger flat across all six strings at the desired fret (first fret for the F major chord). Ensure that it’s close to the fret without being on top of it. This position might feel uncomfortable at first, but with practice, your finger will become stronger and more flexible.
- Placing Other Fingers: For the F major shape, place your middle finger on the G string (third string) at the second fret, your ring finger on the A string (fifth string) at the third fret, and your little finger on the D string (fourth string) at the third fret. This mirrors the E major chord shape but shifts up one fret.
- Applying Pressure: Apply even pressure with your index finger across all strings. Ensure each string rings clearly when strumming individually.
- Checking for Clear Notes: Strum each string individually to check for clarity. Adjust your finger positions as needed to avoid muted or buzzing sounds.
Tips for Practice
- Start with short practice sessions to build finger strength without straining.
- Regularly check each string for clarity.
- Use a metronome to practice switching between chord shapes rhythmically.
Section 2: Finger Position for the F Barre Chord
Mastering the F barre chord requires precise finger positioning. This section will guide you through each step, using music theory as a foundation to ensure clarity and helpfulness.
Root Note and Barre Technique
Barre with Index Finger- Start by placing your index finger flat across all six strings at the first fret. This action creates a barre, effectively shifting the nut of the guitar up by one fret. Ensure your finger is parallel to the fret, not on top of it, to avoid buzzing. The goal is to press all strings down evenly, with the tip of your finger slightly curled to avoid touching the adjacent frets.
Building the Chord

- Middle Finger on the G String: Place your middle finger on the G string (third string from the bottom) at the second fret. This note is A, the major third of the F major chord, which gives the chord its major quality.
- Ring Finger on the A String: Position your ring finger on the A string (second string from the top) at the third fret. This is the note C, the perfect fifth of the F major chord, contributing to the chord’s stability.
- Little Finger on the D String: Put your little finger on the D string (third string from the top) at the third fret. This also plays the note C, reinforcing the perfect fifth.
Ensuring Chord Clarity
Check Each String: Once your fingers are positioned, strum each string individually, starting from the low E string to the high E string. Each note should ring out clearly without buzzing. If any string sounds muted or buzzes, adjust your finger pressure and positioning.
Tips for Clear Sound
- Thumb Positioning- Your thumb should be positioned at the back of the guitar neck, roughly opposite your index or middle finger. This position provides leverage and helps in applying even pressure across the barre.
- Finger Curvature- Except for the index finger, ensure the other fingers are curved, pressing down on the strings using their fingertips. This prevents them from accidentally muting adjacent strings.
- Pressure Points- Focus on applying pressure with the side of your index finger closer to the thumb. This part of the finger is usually firmer and flatter, making it easier to press down all six strings.
- Wrist Position- Keep your wrist slightly bent to avoid strain. A good wrist position also helps in applying even pressure across the fretboard.
Section 3: Strumming Technique for the F Barre Chord
Understanding the Strumming Mechanics
Strumming the F barre chord involves a combination of right-hand technique and left-hand precision. The goal is to produce a clear, balanced sound across all the strings.
The Right-Hand Technique
- Positioning the Hand- Hold your pick (if using one) between your thumb and index finger, or use your thumb for a softer sound. Your hand should be relaxed, hovering above the strings near the sound hole (on an acoustic guitar) or over the pickups (on an electric guitar).
- Strumming Motion- The strumming motion should come from your wrist, not your elbow. Keep your wrist loose and relaxed. This allows for a smoother strumming motion and better control.
- Strumming the Chord- For the F barre chord, strum all six strings. Start with a downward strum, sweeping across the strings from the low E to the high E. Follow with an upward strum if the rhythm requires it. The motion should be fluid and even.
- Controlled Strumming- Focus on consistent pressure and speed during strumming. The sound should be even across all strings, without any particular string sounding louder than the others.
Coordination with the Left Hand
- Sustaining Pressure- As you strum, it’s crucial to maintain steady pressure with your left hand on the fretboard to avoid any buzzing or muted sounds. This can be challenging at first, especially during faster strumming patterns.
- Quick Check for Clarity- Periodically stop strumming and check each string individually to ensure they’re all ringing clearly. This will help you identify if any adjustments are needed in your finger positioning or pressure.
Practice Tips for Effective Strumming
- Start Slow: Begin with slow, deliberate strums. Focus on the clarity and consistency of the sound.
- Rhythm Patterns: Practice different rhythm patterns to get comfortable with various strumming speeds and complexities. Use a metronome to help maintain a consistent tempo.
- Gradual Increase in Speed: As you become more comfortable, gradually increase your strumming speed. It’s important to build up to faster strumming while maintaining clarity and control.
- Relaxation: Ensure that both your strumming hand and fretting hand are relaxed. Tension can lead to a strained sound and make it harder to play smoothly.
Section 4: Applying the F Barre Chord in Songs
Incorporating the F Barre Chord into Your Playing
Now that you’ve learned the mechanics of the F barre chord, it’s time to apply it in a musical context. Using this chord in songs will not only solidify your skills but also enhance your overall guitar playing.
Understanding Chord Progressions
- Chord Progressions- Most songs are built on chord progressions, a series of chords played in a sequence. The F barre chord often appears in common progressions like I-IV-V (C-F-G in the key of C) or ii-V-I (Gm-C-F in the key of F). Recognizing these patterns will help you anticipate when the F barre chord is coming up in a song.
- Key Transitions– Since the F barre chord is a movable shape, understanding its role in different keys is crucial. For example, in the key of C, F is the IV chord, while in the key of Bb, it’s the V chord. This knowledge allows you to adapt the chord to various musical contexts.
Practical Application in Songs
- Learning Songs: Start with simple songs that use the F barre chord. This could be a song with a slow tempo or one with a repetitive chord progression that includes the F chord. Practice switching to and from the F barre chord within the context of the song.
- Strumming Patterns: Pay attention to the strumming patterns used in these songs. Practice aligning your strumming hand with the rhythm while maintaining the chord shape with your fretting hand.
Song Examples: Here are a few song suggestions to practice:
- “Knockin’ on Heaven’s Door” by Bob Dylan: This song features a simple and repetitive chord progression that includes the F chord.
- “Let It Be” by The Beatles: This classic song uses the F barre chord in its progression and is great for practicing transitions between chords.
- “Hotel California” by The Eagles: For a more advanced challenge, this song includes the F barre chord and offers a complex progression and strumming pattern.
Find us on Instagram: https://www.instagram.com/realbraveaudio/
Find us on Youtube: https://www.youtube.com/@realbraveinc