Everything You Need To Master The G Barre Chord

Section 1: Cracking the Code of the G Barre Chord
Grasping (Pun intended) the Barre Chord
So, you’re holding your guitar, fingers itching to create music that resonates, that sings. Enter the barre chord – your ticket to those soul-stirring songs on Spotify. It’s not just a chord; it’s an entryway to the fretboard. By pressing down several strings with one finger, typically the index, you unlock a universe of chords, all at your fingertips. The barre chord is not just a skill; it’s your secret weapon in the guitar world. At least in the beginning. And it’s not a weapon but… ah forget it was using imagery to make you smile. On to the good stuff
The Mighty G Barre Chord: Your New Best Friend
Do you have friends? I don’t. Now, let’s talk about the G barre chord. It’s not just any chord. It’s on the third Fret? Absolutely. Essential? Without a doubt. This chord is the backbone of countless rock anthems, the soul of many a ballad, and the spirit of folklore.
The Theory – Not as Boring as It Sounds
But wait, there’s more. The G barre chord is rooted deep in music theory. It’s built from a triad- a blend of the root (G), a major third (B), and a perfect fifth (D). This trio is like the Three Musketeers of music, creating a sound that’s full, rich, and unmistakably major.
Let’s show you how to play it:
Finger Position for the G Barre Chord
Laying the Foundation with Theory
Let’s start with a bit of theory from MusicTheory.net: a major chord is constructed using a root note, a major third, and a perfect fifth. For the G major chord, these notes are G (root), B (major third), and D (perfect fifth). The G barre chord uses these notes arranged across the guitar strings to create its distinctive sound.
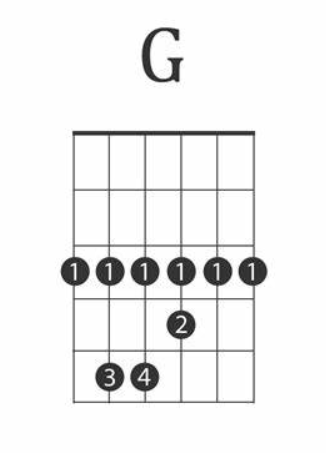
Step-by-Step Finger Placement
- The Barre with the Index Finger:
- Start by barring your index finger across all six strings at the third fret. This is your anchor, the foundation of the chord. The index finger should lie flat across the strings, with its tip slightly curled to avoid touching the adjacent frets. This position will produce the G root note on the low E string.
2. Middle Finger on the B String:
- Place your middle finger on the B string (second string from the bottom) at the fourth fret. This note is B, the major third of the G major chord, adding a bright, harmonic quality to the chord.
3. Ring Finger on the D String:
- Position your ring finger on the D string (fourth string from the bottom) at the fifth fret. This is the D note, the perfect fifth, which adds stability and fullness to the chord’s sound.
4. Little Finger on the G String:
- Finally, put your little finger on the G string (third string from the bottom) at the fifth fret. This reinforces the root note, G, in a higher octave, adding depth to the chord.
Checking for Clarity and Adjusting
Once your fingers are in place, strum each string from the low E to the high E. Each should ring out clearly without any buzzing or muting. If not, adjust your fingers, ensuring they’re not touching any adjacent strings and that you’re applying sufficient pressure.
Tips for Mastery
- Practice Barre Strength– Initially, barring all strings at the third fret might feel strenuous. Regular practice will increase your strength and flexibility.
- Thumb Placement– Your thumb should rest at the back of the guitar neck, opposite your index finger, to provide leverage and support.
- Finger Curvature– Except for the barring index finger, keep your other fingers curved and use the tips to press down the strings.
- Regular Tuning Checks– Ensure your guitar is properly tuned before practicing to develop an ear for the correct sound.
Strumming Technique for the G Barre Chord
Perfecting the Strum
- Hand Position– Hold your pick between the thumb and index finger of your right hand (or use your thumb for a softer sound). Position your hand close to the sound hole (for acoustic) or over the pickups (for electric).
- Strumming Motion– Use a relaxed wrist motion for strumming, avoiding stiff arm movements. This provides better control and fluidity.
- Executing the Strum– Strum all six strings, starting from the low E string, ensuring each string is struck evenly. The motion should be smooth and consistent, whether you’re strumming down or up.
- Balanced Sound– Aim for a uniform sound across all strings. Each string should contribute equally to the chord’s overall sound without any overpowering others.
Tips for Clarity
- Pressure Maintenance: Keep consistent pressure with your fretting hand to prevent any buzzing or muted sounds.
- Adjusting Strumming Dynamics: Experiment with varying your strumming force to achieve different sound dynamics while maintaining clarity.
- Regular Check: Periodically stop and strum each string individually to ensure they are all ringing out clearly.
Applying the G Barre Chord in Songs
Song Selections
- “Wonderwall” by Oasis: Features the G barre chord prominently, making it a great practice song. Sometimes vomit inducing but it’s ok it’s just Oasis. Now you are a 90’s hit at parties!
- “Sweet Child O’ Mine” by Guns N’ Roses: Incorporates the G barre chord in its iconic riffs.
- “Hey Jude” by The Beatles: Uses the G barre chord in its progression, perfect for practicing transitions.
Expanding Your Repertoire
- Versatility: The G barre chord appears in countless songs across genres. Mastering it opens up a vast array of songs to learn.
- Transitions and Progressions: Practice transitioning to and from the G barre chord within songs to build fluidity and confidence.
- Listening and Learning: Pay attention to how the G barre chord is used in different songs to understand its role in various musical contexts.
Find us on Instagram: https://www.instagram.com/realbraveaudio/
Find us on Youtube: https://www.youtube.com/@realbraveinc