Everything You Need To Know The E Barre Chord
Introduction
Welcome to the world of guitar playing, where every chord holds a story, and every strum opens a new horizon of musical possibilities. Today, we’re diving into one of the most fundamental and versatile chords in guitar music – the E Barre Chord. Whether you’re just starting your musical journey or looking to solidify your chord repertoire, understanding the E Barre Chord is a stepping stone to a richer guitar-playing experience. So grab your guitar, and let’s embark on this exciting learning adventure together!
The Basics of the E Barre Chord
Fingering the E Barre Chord
The E Barre Chord might seem daunting at first, but with patience and practice, it becomes a powerful tool in your guitar arsenal. Here’s how you finger this essential chord:
The E Barre Chord: Mastering the Finger Positions
Playing the E Barre Chord may initially seem challenging, but with a clear understanding of each finger’s role and some practice, it becomes an invaluable part of your guitar skills. Let’s break down the finger positions in more detail:
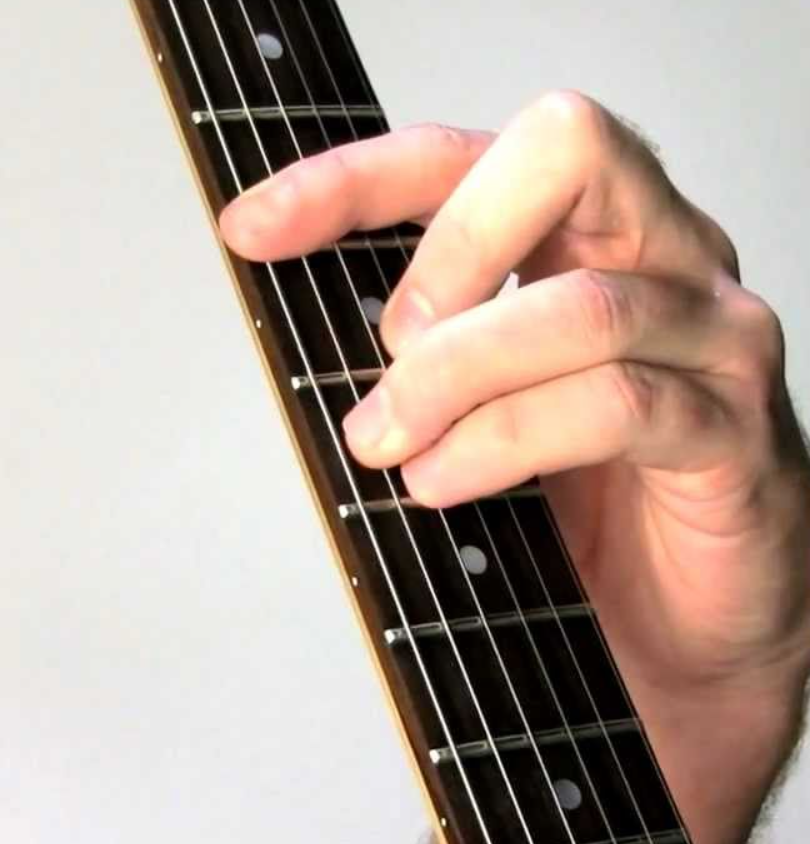
1. Positioning the Index Finger: The Barre
The key to a successful E Barre Chord starts with your index finger. This finger acts as a movable capo, pressing down all six strings. Here’s how to do it:
- Placement: Lay your index finger flat across all six strings. The common position to start with is barring the 1st fret, but this chord is movable, so the fret can vary.
- Pressure: Apply consistent pressure across the fretboard. The goal is to have each string sound clear when strummed.
- Tip: If you find it hard to press all strings down, try rolling your finger slightly to the side, using the harder edge of your finger.
2. Middle Finger on the G String
Once your index finger is in place, it’s time to position your middle finger:
- Placement: Place your middle finger on the G string (3rd string), two frets above the barre. For instance, if you’re barring the 1st fret, place your middle finger on the 3rd fret of the G string.
- Purpose: This finger adds the major third interval to the chord, which defines the chord’s major quality.
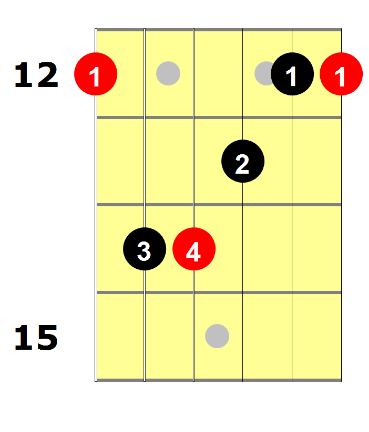
3. Ring and Pinky Fingers: Completing the Chord
The ring and pinky fingers are crucial for completing the chord shape:
- Ring Finger: Position your ring finger on the A string (5th string), two frets above the barre.
- Pinky Finger: Place your pinky right below the ring finger on the D string (4th string), also two frets above the barre.
- Alignment: Ensure these fingers are parallel to the frets and pressed firmly to avoid muting any strings.
Practicing the E Barre Chord
- Step by Step: Begin by practicing the barre with your index finger alone. Once you’re comfortable, add the other fingers one at a time.
- Check Each String: Strum each string individually to ensure they’re ringing clearly. If any string is muted or buzzing, adjust your finger position.
- Building Strength: Initially, your hand might tire quickly. Regular practice will help build the necessary strength and flexibility.
- Transitioning Between Chords: Practice moving into and out of the E Barre Chord from other chords. This will help in developing fluidity in your playing.
Why This Placement?
The beauty of the E Barre Chord lies in its versatility. By barring your index finger and placing the other fingers in this formation, you’re essentially mimicking the open E Major chord shape – but higher up the fretboard. This allows you to play the E Major chord in different pitches, adding variety to your playing.
This is the beginning of the article. If this aligns with your vision, I can continue writing the remaining sections, ensuring to cover all the points and maintain the casual, engaging tone you’ve requested. Let me know your thoughts or any adjustments you’d like!
Understanding the Music Theory Behind the E Barre Chord
The E Barre Chord is more than just a finger position; it’s a gateway to understanding fundamental music theory on the guitar. When you play an E Barre Chord, you’re actually playing a ‘moveable’ shape, which means the same finger positioning can be used to play different chords along the fretboard. The root note of this chord shape is found on the low E string (6th string), which is why it’s called the E Barre Chord. As you move this shape up and down the fretboard, the name of the chord changes based on the note that your index finger is barring on the 6th string.
The E Major and E Minor Scales
In music, scales form the backbone of melodies and harmonies. The E Major scale is bright and cheerful, while the E Minor scale has a more melancholic and reflective mood. These scales are essential for understanding the context in which the E Barre Chord can be used, enriching your playing with emotional depth.
The Rich History of the Key of E Major and E Minor in Music
The key of E Major has been a favorite among composers and musicians for its rich, resonant sound, especially on stringed instruments like the guitar. It carries a brightness and clarity that has been utilized in everything from classical compositions to modern rock songs.
E Minor, on the other hand, often evokes a sense of introspection and depth. It has colored countless ballads and emotional pieces throughout history. By learning the E Barre Chord, you’re tapping into a musical legacy that stretches back centuries and crosses countless genres and styles.
Practical Tips and Tricks for Mastering the E Barre Chord
- Start Slow: Building muscle memory takes time. Start by practicing the chord slowly, ensuring each string rings clearly.
- Strength and Stamina: Barre chords require finger strength. Regular practice will gradually build up your stamina.
- Common Pitfalls: Be mindful of not muting adjacent strings with your barring finger. It’s a common beginner mistake.
- Practice Makes Perfect: Incorporate the E Barre Chord into songs you enjoy playing. This makes practice fun and effective.
Conclusion
The journey of mastering the E Barre Chord is rewarding and transformative. It opens up a world of musical expression and creativity. Remember, every guitarist has started where you are now, and with persistence and passion, you’ll find yourself growing in skill and confidence. Keep strumming, keep learning, and let the music take you where it will.
Additional Resources
To further your journey, explore online tutorials, guitar-focused YouTube channels, and music theory books. Engage with guitar communities online or in local music schools. The more you immerse yourself in the world of music, the more you’ll discover.
Find us on Instagram: https://www.instagram.com/realbraveaudio/
Find us on Youtube: https://www.youtube.com/@realbraveinc