Easy Ways On How To Play The F Sharp Major Scale

Today, we’re diving into the F Sharp Major Scale on the guitar, exploring how to play it across all positions.
Notes Of The F Sharp Major Scale
F Sharp Major Scale consists of 6 sharps, with the notes being:
F# – G# – A# – B – C# – D# – E#
Interestingly, F sharp Major and G flat Major are essentially the same keys, making it convenient to understand them interchangeably. If you’re delving into modes and guitar scales, it’s worth noting that the F# Major scale is essentially identical to the F# Ionian scale. So, for our guitar mode lessons, we’ll treat F# Ionian and F# Major as the same.
Here’s a basic way to start playing the F# Major scale on the guitar:
- Starting Position: Begin at the 2nd fret of the low E string (which is F#).
- Play the Notes: Follow this pattern as you move up the fretboard.
- On the low E string (6th string), play the notes F# (2nd fret), G# (4th fret), and A# (6th fret).
- Move to the A string (5th string) and play B (2nd fret), C# (4th fret), and D# (6th fret).
- On the D string (4th string), play E# (F) (1st fret), F# (3rd fret).
- Continue Up the Scale: You can continue this pattern up the guitar neck, moving to higher strings and using the same whole step/half step pattern that defines the major scale (whole, whole, half, whole, whole, whole, half).
Remember, the key to mastering scales is not just knowing the notes but also practicing the scale in different positions and using various fingerings. This not only helps with learning the scale but also with improving your overall dexterity and familiarity with the fretboard.
Scale Positions
Now, let’s explore the 5 CAGED positions for the F# Major scale, along with the open position. Disclaimer: The images below come along with which finger we recommend to use it with.
Open Position
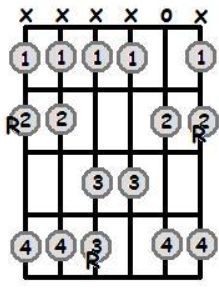
- X: Don’t play that string
- O: Play that string open (without fretting it)
- R: This indicates the root note of the chord.
- Numbers in Circles: These suggest which finger to use. Here’s what they stand for:
- 1: Index finger
- 2: Middle finger
- 3: Ring finger
- 4: Pinky finger
For this open position:
- Your index finger (1) should barre the 2nd fret from the 5th string down to the 1st string.
- Place your middle finger (2) on the 3rd fret of the 3rd string (G string).
- Your ring finger (3) goes on the 4th fret of the 4th string (D string).
- Your pinky (4) also goes on the 4th fret of the 2nd string (B string).
The barred index finger will play multiple notes at the 2nd fret. The chord being played here is likely an F# major barre chord, with the root note (R) on the 4th string. Remember to press firmly to ensure all notes ring clearly.
Option 1 (lowest fret is 1)
- The “1” indicates your index finger. You need to place your index finger across all six strings at the first fret, effectively ‘barring’ the fret.
- The “2” represents your middle finger. Place your middle finger on the third string (G string) at the second fret.
- The “3” is your ring finger. Position your ring finger across the fifth (A string), fourth (D string), and third (G string) strings at the third fret.
- The “4” is your pinky finger. Place it just below your ring finger on the second string (B string) at the third fret.
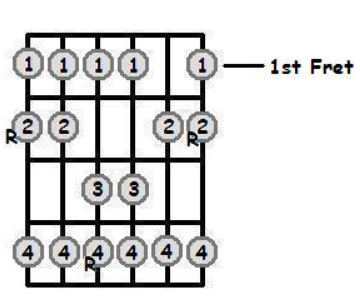
Option 2 (lowest fret is 2)
- First, your index finger, and barre across all six strings on the second fret.
- Your middle finger should be placed on the third string (G string) at the fourth fret.
- Your ring finger goes on the fifth string (A string) at the fourth fret.
- And, your pinky finger goes on the fourth string (D string) at the fourth fret.
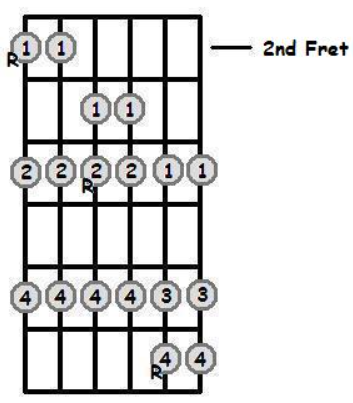
Option 3 (lowest fret is 6)
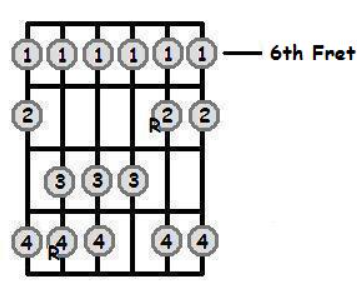
- First, your index finger must barre across all six strings at the 6th fret.
- Then, place your middle finger on the 3rd string (G string) at the 7th fret.
- Place your ring finger on the 5th string (A string) at the 8th fret.
- The “4” is your pinky finger. It should also be placed on the 4th string (D string) at the 8th fret.
Option 4 (lowest fret is 10)
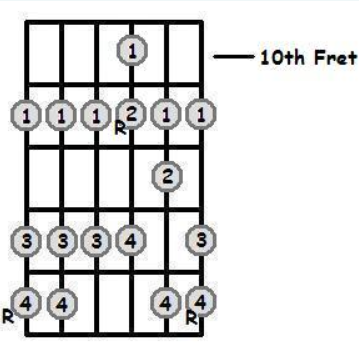
- Start with your index finger on the 10th fret of the G string (3rd string), which is F.
- Play the G note on the 12th fret with your ring finger.
- Play the A note on the 14th fret with your pinky.
- Move to the Bb note on the 11th fret of the B string (2nd string) with your middle finger.
- Play the C note on the 13th fret with your pinky.
- Move to the high E string (1st string) and play the E note on the 12th fret with your index finger.
- Finally, play the F note on the 13th fret with your middle finger to complete one octave.
Interested in taking your guitar skills to the next level? Click the below and book a free lesson with us! We’re committed to helping you express yourself freely on the guitar without endless scales and theory. Happy playing!

Author: Daniel Powers Jr, the founder of Real Brave™, serves as the chief inspiration to thousands of students in the Real Brave music instruction program. He’s also the visionary behind PracticePad™, an online platform for live one-on-one online music lessons, lesson tracking, and scheduling. Beyond his entrepreneurial pursuits, Daniel leads a non-profit organization that provides formerly homeless children with access to music education, making a profound impact on their lives. His unwavering dedication to music, innovation, and education continues to inspire individuals to reach their fullest potential while creating positive change in communities. Follow Real Brave on all the socials:
Find us on Instagram: https://www.instagram.com/realbraveaudio/
Find us on Youtube: https://www.youtube.com/@realbraveinc