E Major Scale – All You Need To Know About How To Play It – Easy Guide
In this blog, we will teach you about the notes, formula, structure, and positions, that are part of the E Major scale on guitar.
Notes Of The E Major Scale
Let’s start by saying that the E Major scale consists of the following notes:
E, F#, G#, A, B, C#, D#
Structure
The E Major is a major scale has the following structure:
- E – Root
- F# – Major 2nd
- G# – Major 3rd
- A – Perfect 4th
- B – Perfect 5th
- C# – Major 6th
- D# – Major 7th
Scale Structure
Because the E Major is a major scale, it follows the regular major scale structure of whole and half-step intervals:
Whole – Whole – Half – Whole – Whole – Whole – Half
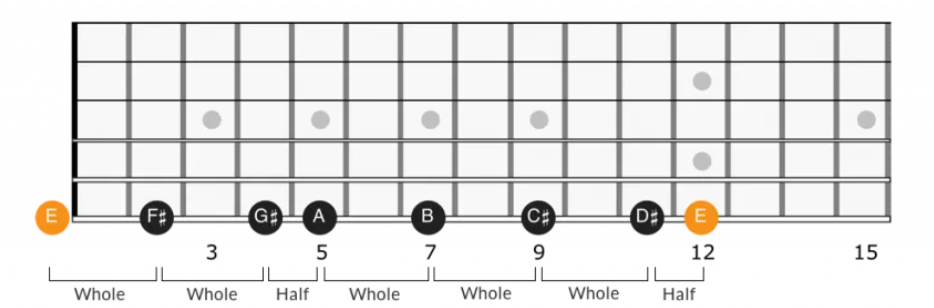
Image by: Applied Guitar Theory
How To Play It?
To play the E Major scale on the guitar, you’ll start with the open E string (6th string) as your root note. From there, you can follow these steps to play the scale in the first position:
- Open 6th string (E) – This is your starting note.
- 2nd fret on the 6th string (F#) – Use your index finger to press down.
- 4th fret on the 6th string (G#) – Use your ring finger to press down.
- Open 5th string (A) – Simply play the open A string.
- 2nd fret on the 5th string (B) – Use your index finger here.
- 4th fret on the 5th string (C#) – Use your ring finger.
- 1st fret on the 4th string (D#) – Use your index finger.
- 2nd fret on the 4th string (E) – This is the octave E, use your middle finger.
This sequence will give you one octave of the E Major scale. To continue up the neck, or to play in different positions, you would learn different fingerings and patterns. It’s also beneficial to practice the scale descending, starting from the octave E and working your way back down to the open E string.
Remember, that practicing the E Major scale slowly and accurately is key to building muscle memory and speed. Using a metronome can help you keep time and gradually increase your speed as you become more comfortable with the scale.
Scale Positions
Option 1
- Start on the 7th fret of the 5th string (E, the root note), using your middle finger.
- Play the 9th fret on the same string (F#) with your pinky.
- Move to the 6th fret on the 4th string (G#) with your index finger.
- Play the 7th fret on the 4th string (A) with your middle finger.
- Play the 9th fret on the 4th string (B) with your pinky.
- Move to the 6th fret on the 3rd string (C#) with your index finger.
- Play the 8th fret on the 3rd string (D#) with your ring finger.
- Play the 9th fret on the 3rd string (E) with your pinky.
- Move to the 7th fret on the 2nd string (F#) with your middle finger.
- Play the 9th fret on the 2nd string (G#) with your pinky.
- Move to the 7th fret on the 1st string (A) with your middle finger.
- Play the 9th fret on the 1st string (B) with your pinky.
- Finish on the 12th fret on the 1st string (E, the octave) with your pinky.
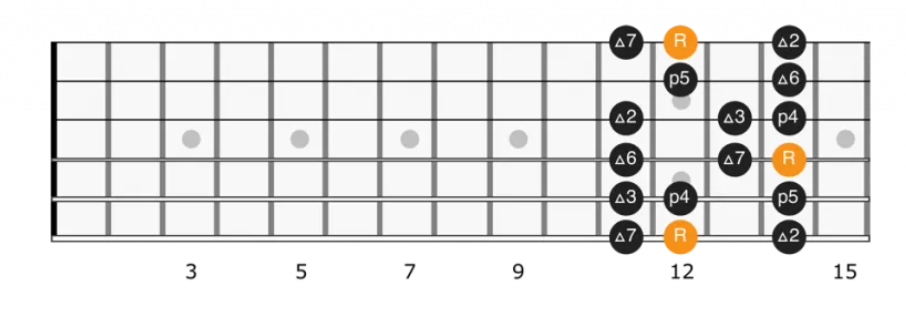
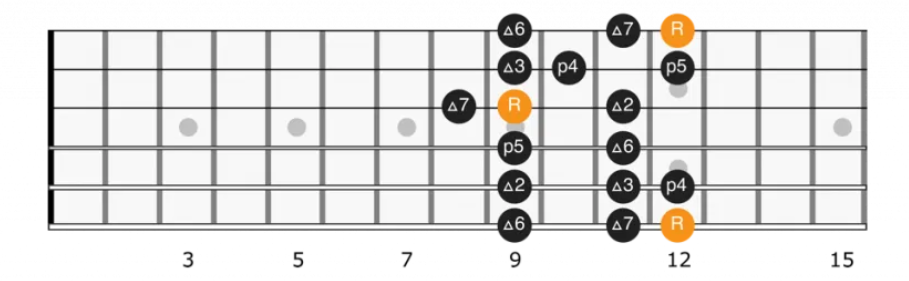
Option 2
- 7th fret on the 5th string (E) – Start here with your middle finger (indicated as “R” for root note).
- 9th fret on the 5th string (F#) – Use your pinky (p5).
- 6th fret on the 4th string (G#) – Move to this note with your index finger (2).
- 7th fret on the 4th string (A) – Use your middle finger (3).
- 9th fret on the 4th string (B) – Use your pinky (p4).
- 6th fret on the 3rd string (C#) – Switch to this note with your index finger (2).
- 8th fret on the 3rd string (D#) – Use your ring finger (4).
- 9th fret on the 3rd string (E) – Play this with your pinky (p5).
- 7th fret on the 2nd string (F#) – Use your middle finger (3).
- 9th fret on the 2nd string (G#) – Use your pinky (p4).
- 5th fret on the 1st string (A) – Switch to this note with your index finger (2).
- 7th fret on the 1st string (B) – Use your middle finger (3).
- 9th fret on the 1st string (C#) – Use your pinky (p4).
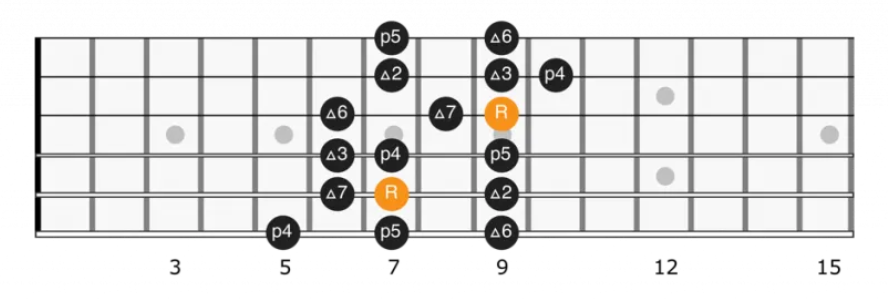
Option 3
- Start on the 7th fret of the 5th string (E) with your middle finger (the root note of the scale, marked with “R”).
- Play the 9th fret on the 5th string (F#) with your pinky (p5).
- Move to the 6th fret on the 4th string (G#) with your index finger (2).
- Play the 7th fret on the 4th string (A) with your middle finger (3).
- Play the 9th fret on the 4th string (B) with your pinky (p4).
- Go to the 6th fret on the 3rd string (C#) with your index finger (2).
- Play the 8th fret on the 3rd string (D#) with your ring finger (4).
- Play the 9th fret on the 3rd string (E) with your pinky (p5).
- Move to the 7th fret on the 2nd string (F#) with your middle finger (3).
- Play the 9th fret on the 2nd string (G#) with your pinky (p4).
- Go to the 5th fret on the 1st string (A) with your index finger (2).
- Play the 7th fret on the 1st string (B) with your middle finger (3).
- Finish on the 9th fret on the 1st string (C#) with your pinky (p5).
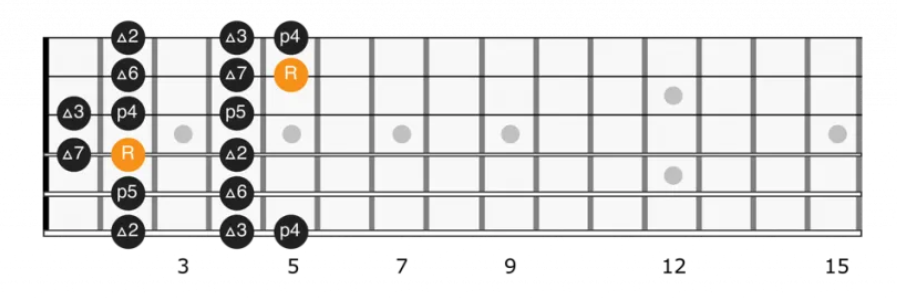
Option 4
- Play the 7th fret on the 6th string (E) with your ring finger (R).
- Move to the 9th fret on the 6th string (F#) with your pinky (p5).
- Go to the 6th fret on the 5th string (G#) with your index finger (2).
- Play the 7th fret on the 5th string (A) with your middle finger (3).
- Play the 9th fret on the 5th string (B) with your pinky (p5).
- Move to the 6th fret on the 4th string (C#) with your index finger (2).
- Play the 7th fret on the 4th string (D#) with your middle finger (4).
- Play the 9th fret on the 4th string (E) with your pinky (p5, R).
- Go to the 6th fret on the 3rd string (F#) with your index finger (2).
- Play the 8th fret on the 3rd string (G#) with your ring finger (4).
- Move to the 9th fret on the 3rd string (A) with your pinky (p5).
- Go to the 7th fret on the 2nd string (B) with your middle finger (3).
- Play the 9th fret on the 2nd string (C#) with your pinky (p5).
- Move to the 5th fret on the 1st string (D#) with your index finger (2).
- Play the 7th fret on the 1st string (E) with your middle finger (3).
- Finish on the 9th fret on the 1st string (F#) with your pinky (p5).
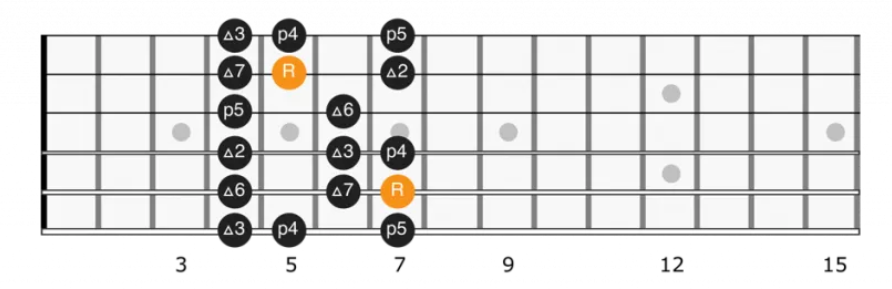
Option 5
- Start on the 7th fret of the 4th string (E) with your middle finger (R for root note).
- Play the 9th fret on the 4th string (F#) with your pinky (p5).
- Move to the 6th fret on the 3rd string (G#) with your index finger (2).
- Play the 7th fret on the 3rd string (A) with your middle finger (3).
- Play the 9th fret on the 3rd string (B) with your pinky (p5).
- Move to the 6th fret on the 2nd string (C#) with your index finger (2).
- Play the 7th fret on the 2nd string (D#) with your middle finger (4).
- Play the 9th fret on the 2nd string (E) with your pinky (p5, R).
- Move to the 7th fret on the 1st string (F#) with your middle finger (3).
- Play the 9th fret on the 1st string (G#) with your pinky (p5).
- Move back down by playing the 7th fret on the 1st string (F#) with your middle finger (3).
- Play the 9th fret on the 2nd string (E) with your pinky (p5, R).
- Move to the 7th fret on the 2nd string (D#) with your middle finger (4).
- Play the 6th fret on the 2nd string (C#) with your index finger (2).
- Move to the 9th fret on the 3rd string (B) with your pinky (p5).
- Play the 7th fret on the 3rd string (A) with your middle finger (3).
- Play the 6th fret on the 3rd string (G#) with your index finger (2).
- Finish on the 9th fret on the 4th string (F#) with your pinky (p5).
- Finally, play the 7th fret on the 4th string (E) with your middle finger (R).
Interested in taking your guitar skills to the next level? Click the below and book a free lesson with us! We’re committed to helping you express yourself freely on the guitar without endless scales and theory. Happy playing!

Author: Daniel Powers Jr, the founder of Real Brave™, serves as the chief inspiration to thousands of students in the Real Brave music instruction program. He’s also the visionary behind PracticePad™, an online platform for live one-on-one online music lessons, lesson tracking, and scheduling. Beyond his entrepreneurial pursuits, Daniel leads a non-profit organization that provides formerly homeless children with access to music education, making a profound impact on their lives. His unwavering dedication to music, innovation, and education continues to inspire individuals to reach their fullest potential while creating positive change in communities. Follow Real Brave on all the socials:
Find us on Instagram: https://www.instagram.com/realbraveaudio/
Find us on Youtube: https://www.youtube.com/@realbraveinc