Introducting How To Play The E Major Blues Scale

The blues scale is a fundamental component of many music styles, from rock and jazz to, of course, the blues. Today, we’ll dive into the E Major Blues Scale, which adds a soulful twist to the major scale. Whether you’re a beginner or a seasoned guitarist looking to expand your repertoire, this guide will help you master the E Major Blues Scale on your guitar.
Understanding the E Major Blues Scale
The E Major Blues Scale is essentially the E Major Pentatonic Scale with an added note – the blues note. This note adds that distinctive bluesy feel to your playing. Here’s the formula for the E Major Blues Scale:
E Major Pentatonic Scale: E – F# – G# – B – C#
Blues Note: G
E Major Blues Scale: E – F# – G – G# – B – C#
Step-by-Step Guide to Playing the E Major Blues Scale
1. Learn the Scale Positions
The E Major Blues Scale can be played across the fretboard in various positions.
1st Position
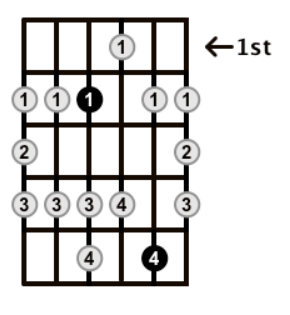
- Start on the Low E String: Place your index finger on the 1st fret (F). Place your ring finger on the 3rd fret (G). Place your pinky finger on the 4th fret (G#).
- Move to the A String: Place your index finger on the 1st fret (Bb). Place your middle finger on the 2nd fret (B). Place your ring finger on the 3rd fret (C).
- Move to the D String: Place your index finger on the 1st fret (Eb). Place your middle finger on the 2nd fret (E). Place your ring finger on the 3rd fret (F).
- Move to the G String: Place your index finger on the 1st fret (Ab). Place your ring finger on the 3rd fret (A).
- Move to the B String: Place your index finger on the 1st fret (C). Place your middle finger on the 2nd fret (C#).
- Move to the High E String: Place your index finger on the 1st fret (F). Place your ring finger on the 3rd fret (G). Place your pinky finger on the 4th fret (G#).
4th Position
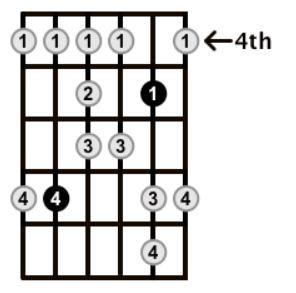
- Start on the Low E String: Place your index finger on the 4th fret (G#). Place your pinky finger on the 7th fret (B).
- Move to the A String: Place your index finger on the 4th fret (C#). Place your middle finger on the 5th fret (D). Place your ring finger on the 6th fret (E). Place your pinky finger on the 7th fret (F#).
- Move to the D String: Place your index finger on the 4th fret (G#). Place your ring finger on the 6th fret (A).
- Move to the G String: Place your index finger on the 4th fret (C#). Place your ring finger on the 6th fret (D).
- Move to the B String: Place your index finger on the 4th fret (F#). Place your middle finger on the 5th fret (G).
- Move to the High E String: Place your index finger on the 4th fret (G#). Place your pinky finger on the 7th fret (B).
9th Position
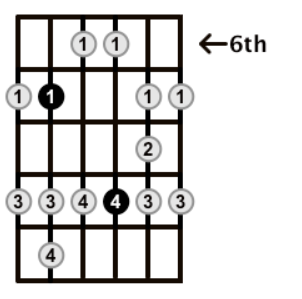
- Start on the Low E String: Place your index finger on the 9th fret (F#). Place your pinky finger on the 12th fret (A).
- Move to the A String: Place your index finger on the 9th fret (B). Place your middle finger on the 10th fret (C). Place your ring finger on the 11th fret (C#). Place your pinky finger on the 12th fret (D).
- Move to the D String: Place your index finger on the 9th fret (E). Place your ring finger on the 11th fret (F#).
- Move to the G String: Place your index finger on the 9th fret (A). Place your ring finger on the 11th fret (B).
- Move to the B String: Place your index finger on the 9th fret (C#). Place your pinky finger on the 12th fret (E).
- Move to the High E String: Place your index finger on the 9th fret (F#). Place your pinky finger on the 12th fret (A).
11th Position
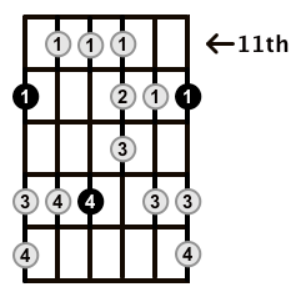
- Start on the Low E String: Place your index finger on the 12th fret (E).
- Move to the A String: Place your index finger on the 11th fret (F). Place your middle finger on the 12th fret (F#). Place your pinky finger on the 14th fret (G#).
- Move to the D String: Place your index finger on the 11th fret (B). Place your pinky finger on the 14th fret (D).
- Move to the G String: Place your index finger on the 11th fret (E). Place your middle finger on the 13th fret (F#). Place your ring finger on the 14th fret (G).
- Move to the B String: Place your index finger on the 12th fret (B). Place your ring finger on the 14th fret (C#).
- Move to the High E String: Place your index finger on the 11th fret (E). Place your middle finger on the 12th fret (F). Place your pinky finger on the 14th fret (G#).
2. Practice Slowly
Start by playing the scale slowly, ensuring that each note rings out clearly. Use alternate picking (down-up-down-up) to develop your right-hand technique.
3. Focus on the Blues Note
The blues note (G) is what gives the scale its character. Experiment with bending this note, sliding into it, or adding vibrato to emphasize its bluesy quality.
4. Improvise and Experiment
Once you’re comfortable with the scale and some basic licks, start improvising. Play along with a backing track in the key of E major and explore different ways to incorporate the blues note. Improvisation is key to developing your unique style and sound.
Tips for Mastering the E Major Blues Scale
- Use a Metronome: Practicing with a metronome helps develop your timing and rhythm.
- Listen to the Blues: Immerse yourself in blues music to understand how the scale is used by different artists.
- Record Yourself: Recording your practice sessions can help you identify areas for improvement and track your progress.
- Jam with Others: Playing with other musicians can provide new insights and ideas, making your practice more enjoyable and effective.
The E Major Blues Scale is a versatile and expressive tool that can add a new dimension to your playing. By practicing the scale, experimenting with different techniques, and incorporating it into your improvisations, you’ll be well on your way to mastering this essential element of blues guitar. Happy playing!
If you’re interested in learning an instrument, at Real Brave, we offer an incredible experience like no other place in music lessons for kids and adults by guiding them from the beginning stages of getting to know an instrument all the way through performing for family and friends on stage. Our instructors come from all over the world, bringing extensive experience on a wide range of instruments. Click below and book a free lesson with us!

Author: Daniel Powers Jr, the founder of Real Brave™, serves as the chief inspiration to thousands of students in the Real Brave music instruction program. He’s also the visionary behind PracticePad™, an online platform for live one-on-one online music lessons, lesson tracking, and scheduling. Beyond his entrepreneurial pursuits, Daniel leads a non-profit organization that provides formerly homeless children with access to music education, making a profound impact on their lives. His unwavering dedication to music, innovation, and education continues to inspire individuals to reach their fullest potential while creating positive change in communities. Learn how to play guitar online.
Follow Real Brave on all the socials:
Find us on Instagram: https://www.instagram.com/realbraveaudio/
Find us on Youtube: https://www.youtube.com/@realbraveinc