Introducing How to Read Guitar Chord Diagrams – Easy

If you’re just starting out on your guitar journey, chances are you’ve come across chord diagrams and felt a bit overwhelmed. Don’t worry; you’re not alone! Guitar chord diagrams are one of the most common ways to learn chords, and once you understand how to read them, you’ll unlock a whole new level of playing. So, let’s break it down step-by-step!
What Are Guitar Chord Diagrams?
Guitar chord diagrams are visual representations of the guitar neck that show you exactly where to place your fingers to play a specific chord. Think of them as a roadmap for your fingers! They provide a straightforward way to learn new chords without having to read traditional sheet music.
Understanding the Layout of the Diagram
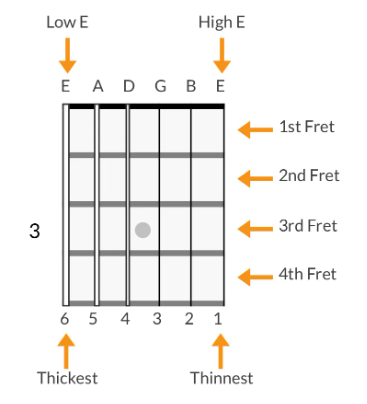
Before diving into the details, let’s familiarize ourselves with the basic layout of a guitar chord diagram:
- Vertical Lines: These lines represent the six strings of the guitar. From left to right, they show the low E (thickest string) to the high E (thinnest string).
- Horizontal Lines: The horizontal lines represent the frets. The top line usually represents the nut (the top part of the guitar neck), and the lines below represent the frets in sequence (1st, 2nd, 3rd, etc.).
- Dots: Dots are placed on the diagram to show where you should place your fingers. Each dot is positioned on the string and fret that you need to press down.
- Numbers: Numbers on the dots indicate which finger to use. Here’s a quick rundown: 1 = Index finger, 2 = Middle finger, 3 = Ring finger, 4 = Pinky finger
- X and O Symbols: These symbols appear above the diagram and indicate whether a string is played or muted: X: Do not play this string, O: Play this string open (without pressing down on any frets).
Step-by-Step: How to Read a Chord Diagram
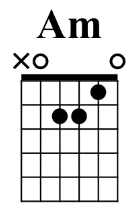
Let’s go through reading a chord diagram using a simple example: the C Major chord.
- Identify the Strings: Look at the vertical lines to see which strings you’ll be playing. For C Major, all strings except the low E string will be played.
- Locate the Frets: Find the horizontal lines, which represent the frets. The diagram will show you which fret to press on each string.
- Place Your Fingers: Check the dots and numbers on the diagram. For C Major:
– Place your index finger (1) on the first fret of the B string.
– Place your middle finger (2) on the second fret of the D string.
– Place your ring finger (3) on the third fret of the A string.
4. Understand Open and Muted Strings: The low E string has an “X” above it, meaning you don’t play this string. The high E and G strings have “O” above them, indicating they should be played open.
Common Mistakes When Reading Chord Diagrams
- Misplacing Fingers: Always double-check which finger goes where. It’s easy to mix up finger placements, especially when learning new chords.
- Ignoring Open Strings: Make sure you include the open strings indicated by the “O.” Missing these can make your chord sound incomplete.
- Overlooking Muted Strings: Muted strings (marked by an “X”) shouldn’t be played. Pay attention to avoid hitting them when strumming.
Tips for Practicing Chord Diagrams
- Start Slow: Don’t rush when learning a new chord. Take your time placing each finger correctly.
- Strum Slowly: After positioning your fingers, strum each string individually to ensure every note rings clearly.
- Use a Metronome: Gradually increase your speed using a metronome to maintain consistent timing as you practice chord transitions.
- Repeat Often: Repetition is key to muscle memory. The more you practice reading and playing with diagrams, the quicker you’ll learn.
Final Thoughts
Learning to read guitar chord diagrams is a skill that will serve you well throughout your guitar-playing journey. These diagrams are your gateway to countless chords and songs, making them an essential tool for every guitarist. So grab your guitar, pick a few chord diagrams, and start practicing. Before you know it, you’ll be strumming your favorite songs with ease!
Interested in taking your guitar skills to the next level? Click the below and book a free lesson with us! We’re committed to helping you express yourself freely on the guitar without endless scales and theory. Happy playing!

Author: Daniel Powers Jr, the founder of Real Brave™, serves as the chief inspiration to thousands of students in the Real Brave music instruction program. He’s also the visionary behind PracticePad™, an online platform for live one-on-one online music lessons, lesson tracking, and scheduling. Beyond his entrepreneurial pursuits, Daniel leads a non-profit organization that provides formerly homeless children with access to music education, making a profound impact on their lives. His unwavering dedication to music, innovation, and education continues to inspire individuals to reach their fullest potential while creating positive change in communities. Follow Real Brave on all the socials:
Find us on Instagram: https://www.instagram.com/realbraveaudio/
Find us on Youtube: https://www.youtube.com/@realbraveinc